Friday, 24 April 2020

1/600 Coastal Naval - Merchantmen

In the past I have played WW2 naval games in 1/3000 (I think) using big battleships and totally ahistorical fleets, just whatever ships took my fancy to buy and paint.  Yes, I said paint, because I actually did!  I know, what a surprise.  I know the rules - no pics, it didn't happen!!  Sorry, I can't provide evidence as I sold them on to someone else a littlewhile back.  Overall I enjoyed the games but felt that the long range firing that the larger calibre guns on bigger Cruisers and Battleships could do to the much smaller Destroyers, for me, took something away from the game.  I loved it when the smaller ships got up close and were able to open fire with their smaller calibre guns and torpedoes.  This got me looking for something that enabled me to use torpedoes more often which brought me to coastal naval battles using motorboats (MTB's, MGB's etc.) and Schnell boats, what the British called E-Boats.  I found a number of rulesets and picked up some 1/600 models from an old friend who was having a clearout of unused models which was great for me as they came ready painted - big bonus.  Over time I have had the hankering to add to the collection so I picked up some merchantmen along with a small number of Allied & Axis vessels from the Skytrex Coastal Forces Ships range, which are now sold by Heroics & Ros (http://www.heroicsandros.co.uk), quite a while back.  Due to my reluctance to paint they have sat in the pile of shame, until now.  

CF904 - Oil Tanker at the front after some serious filing of the hull
& CF905 - Coastal Collier behind.

I picked up the jiffy bag with the models in and had a good look through them all too remind me what was there.  With all of the boats and ships, there was a good mix, but only 1 of each type - I think I just wanted to see what was available and get an idea of how easy or difficult they were going to be to put together.   The MTB's, MGB's and S-Boots were put to one side for a later date and I decided that the merchantmen were going to be my next project on my desk.


 CF907 - 3000 ton Tramp Steamer, in bag, waiting to be built
& CF906 - 1500 ton Collier behind

From smallest to largest the ships are:
  • CF905 - Coastal Collier (4 pieces)
  • CF906 - 1500 ton Collier (4 pieces)
  • CF907 - 3000 ton Tramp Steamer (6 pieces)
  • CF904 - Oil Tanker (15 pieces)

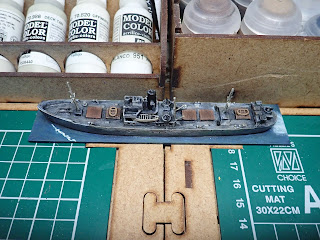
All four ships waiting for basing & some paint. 

All of the models have minimal pieces, with 15 being the maximum including the hull, but most were half a dozen or less which was great as they would be relatively quick to build.  The loose pieces were all well moulded with minimal flash or mould lines but the hulls were something different altogether.  There were some quite deep mould lines or steps along the hulls which took quite a bit of filing to remove and in some places some filling, in fact on one ship, the Oil Tanker, I had to file that much off that I totally removed the moulded anchor as well due to the 'step' going right through this area. Not too much of an issue overall as the anchor was painted back on, just a bit of a pain due to the amount of filing needed.  

After cutting suitably sized bases from sheets of plasticard, they were spray undercoated in black.  Bases were 25mm wide for the 2 smaller ships & 30mm for the larger 2 - the base length was based on the measured length of the ships hull plus 10mm which gives just about enough space around the model to paint in some sea and the wake for a vessel under way. 


CF907 - 3000 ton Tramp Steamer based & undercoated

I painted the first three relatively quickly, in one evening session, and I can actually say that I enjoyed doing it.  My idea of how they would look was pretty much how they came out.  I think this is one of my painting kryptonites, in that I always think that what I paint won't look anything like I envision it or anywhere near as good.  Painting these has given me a bit of a confidence boost and made me want to get on with something else.
 CF905 - 800 ton Collier

 CF907 - Tramp Steamer

 CF904 - Oil Tanker

After finishing the Oil Tanker, Tramp Steamer and small Collier I had hoped to get the last merchantman painted reasonably quickly, but my get up and go got up and went for a few days.  It took me nearly a week to pick up a brush again and finish off the last of this small group of ships.

The 800 ton Collier was painted a mid-dark grey with the superstructure and hatches blue-grey.  This came out a bit 'bright' for my liking so it was toned down with a heavy grey dry-brush over the hull.  The other 3 were heavily dry-brushed with different grey tones and just had smaller details painted in, such as the ships boats & life rafts.  In some places I have also used an Army Painter Strong Tone wash. 


The bases were first dry-brushed Prussian Blue, then gunship green (although the green doesnt show too well in the pictures) before I dappled in the bow wave and dry-brushed the stern wake with off-white.  I have seen some ships that had textured bases where the wake had been built up with ready made plaster before painting which looked really effective & may try this at a later date.  For now, I think the wakes I have painted on look pretty good.

At some point in the next few days I will take some photos of the other painted ships I have and use these for my next blog entry.

Tuesday, 7 April 2020

20mm WW2 German Transport

I intended painting these up to take part in the monthly group build for March on the Battlegroup Facebook page. Unfortunately my painting mojo didn't kick in early enough for me to get them finished in time but here they are now.  There are a pair of Pegasus Hobbies 'German Army Trucks' and an RSO from the Plastic Soldier Company.  The canopies of all 3 vehicles have not been fixed in place so that I have options for how I use them.


The Trucks were undercoated with Vallejo Grey primer from the can, with the chassis & cab interior kept separate from the cab body & rear cargo area.  At this point I gave everything a spray coat of AK DunkelGelb (AK1023) and once this was dry I painted the bench seat a leatherlike brown and gave the interior a quick wash of Army Painter Strong Tone.  The tyres were painted dark grey, the two halves were glued together and then I gave the whole vehicle an Army Painter Soft Tone wash. 


The AK comes out quite light, what I might consider to be more along the lines of something that the Afrika Korps might have used in North Africa but the wash toned it down somewhat giving me a yellow I am happy with for mid/late war use.  Once this had all been drybrushed with a light tone it gave me something I am pretty happy with for the vehicle itself.  The canopies were just given a dark tone wash and dry brush of light grey - job done.  At this point I was toying with trying some chipping and took a look at a few Youtube turorials with gave me the basics.  I used a dark brown (Vallejo 70.822, SS Camouflage Black Brown) with a bit of foam to dab on chips mainly in areas that might see some heavy wear but also across the rest of the vehicle.  I tried not to get too heavy handed and, for a first attempt, don't think I have done a bad job.  The chipping could have been enhanced with some light lines under some of the larger chipped areas, but my sausage fingers were not up to the task - I tried but found I was a bit heavy handed, so gave up.  I will give it another go next time I paint vehicles.
 

The RSO was started some time back with a sprayed light grey undercoat and then a brushed on watered down coat of Vallejo Dunkelgelb - the canopy was also painted a dark grey (not sure which shade).  I wasn't too happy with the colour at this point so it was put to one side until I decided to have another go at it the other day.  Once I dragged it back out, it was given a quick spray of Army Painter Late War German Dunkelgelb, which I was much happier with, then a wash with Mid Tone and drybrush with something I mixed up from my paint collection as the paints I have were either too dark or too light to my eyes.

The tracks were painted a mid grey (Vallejo Med Sea Grey I think), which in hindsight should have been darker, then washed with a rust wash and drybrushed with the same mid grey they had initially been coated in.   Not bad, but could do better next time.  The canopy had previously been painted a dark grey - not quite as dark as German grey as I found out when I tried to use it to correct some heavy handed dry brushing which then showed up a lot darker than the rest.  Lesson learnt, to keep a record of what paints have been used for a model so that I can use it at a later date, or paint the model in one hit so that I don't need to remember what has been used.

At  this point the vehicle could have gone on the table, but as I was trying my hand at chipping on the 2 Trucks above I got busy on the RSO too.  I was a bit lighter with the chips on this vehicle which I think worked well.  The windscreen & other windows had been painted Vallejo London Grey but I wanted to try another first for me, to transition a lighter grey over the London grey, from darker at the bottom to lighter at the top, using a glazing technique on a wet palette.  While the transitions were not as seamless as they possibly could have been they worked and gave a nice effect of more light reflecting off of the top of the glass.  Unfortunately the pictures don't show this too welll.  I also did 2 diagonal stripes on the 2 windscreens and 1 on each of the door windows to show a bit of glare.

The one problem I had with this was that I found the grey was too light a colour on the white papeer of the wet palette and it was difficult to see it once it had been diluted down to a glaze. 

Once finished, all of the vehicles look pretty good to my eyes and I hope to get them onto the gaming table sometime soon.  I have used 2 techniques for the first time, chipping & glazing, both with reasonable success giving me confidence to try them again.  

As my last 4 posts have all been 20mm I am going to go in a different direction for the next one, just not sure what yet.

Saturday, 4 April 2020

SHQ 20mm WW2 British (part 2)

It has taken a little longer than anticipated to finish off the figures - I'm just not getting my painting mojo going - they are now varnished and flocked.  All in all, I am pretty happy with how they have turned out but think I need to have a look at what to do when painting faces.  This is something I have difficultly with as I don't have the fine brush skills (yet) or the patience.  I'll have to search through Youtube for a half decent tutorial that I can get some pointers from. 

Varnishing these figures was a chance for me to test out AK products for the very first time, in this case Gloss (AK1012) and Matt (AK1013) spray varnish rattle cans.  Whilst spraying the figures I was a bit heavy handed with the gloss as I think some of the detail isn't now as clear as it was prior.  This also resulted in needing to make a couple of passes with the matt spray too, potentially further masking detail.  After the Matt coat was dry I felt there was still quite a bit of a sheen, almost like a Satin coat, on the figures which the Matt should have done away with.  After a bit of thought this could be down to 1 of 2 things...
  1. Using too much/too heavy a coat of Gloss,
  2. Not allowing the Gloss to dry fully - I left it an hour or so before spraying the Matt over the top.
For the moment I will keep an open mind with regard to the AK spray can varnishes.  A lot of people sing the manufacturers praises so there is obviously something in them and I realise the 'issue' may have been of my own making.

To get rid of the Satin sheen I  brushed on a coat of Vallejo Matt varnish (70.520) which has dulled them down nicely and got them to where I think they should be.  Quite a few tufts were added which I picked up from Great Escape Games at 'Attack' in Devizes and I will be picking up more at the next Devizes show.  I used 3 different types of tufts on the bases which I feel adds too the overall effect of the figure. 


These figures, as mentioned in a previous entry, are going to be used and Engineers.  They will make up 2 Companies for Rapid Fire (8 figs per Coy) and a couple of Engineer Platoons (2 figs) with flame throwers to be attached to assaulting Battalions, or all of the can be used as a larger force for any other set of rules.  I will pick up a couple of figures with mine detectors in the not too distant future which will free up the rifle men to be used in an Infantry force. 

Battle for the Narrow Seas

After my last post which involved painting up some merchantmen for coastal naval battles I thought I would dig out the rest of my models ...